In my previous article, I wrote about how to implement Redis OM (Object Mapper) using NodeJs. In this article, we will be learning how to implement Redis with the Laravel framework.
Laravel is an open-source robust framework embedded in the PHP programming language, used for developing scalable, high-performance web applications. We are using the Laravel framework to develop APIs for storing and retrieving records on the Redis Database.
This tutorial provides a basic understanding of the commonly used Redis commands.
What is Redis?
Redis is an open-source in-memory key/value pair database. This is to say that data sets are stored in RAM instead of the disk (SSD, HDD) in a key and value format. Some of the pros of using Redis are its speed and high availability. The major disadvantage of using Redis is memory consumption. Due to the fact data are stored in memory you may require large memory space to store your records if your dataset is large. That brings us to Redis Enterprise.
What is Redis Enterprise
Redis Cloud also known as Redis Enterprise is a cloud service that manages your Redis dataset in a highly available and scalable manner. Redis Enterprise takes the burden of purchasing large Memory space off your shoulders so you can focus on the core development of your applications. On Redis Enterprise you can create a free account and if you are not too familiar with the platform you can kick off with the free 30MB storage that is assigned to your account after a successful registration. When you start working with large datasets you are required to start a paid plan.
Before we start setting up the development environment there are prerequisite tools that must be in place.
Prerequisite
- PHP
- Composer
- IDE
- Docker
Redis Cloud Account Setup
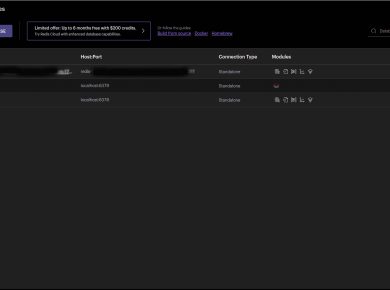
Use this link: Redis Enterprise to create a free account. After creating your account, you can either create a paid subscription or utilise the free 30Mb assigned to your account. If you want to use the free 30Mb (for test purposes) then go ahead and create a database. After creating an account you should have an interface similar to the image below.
For this tutorial, we are using the free subscription.
To create a database, click on the New database button. After clicking on the button enter a database name, and you should have an interface similar to the image below.
At the top right is the Activate database button, go ahead and activate your database.
Click on your database name and it will display the database credentials that you will be using later in this tutorial.
Local Setup
If you want to set up Redis Server on your local machine, follow the instructions below.
Local Setup With Docker
Is time to download the Redis docker container. Before we do that ensure the Docker engine is already installed and functioning correctly on your system. The essence of downloading the Redis Docker container is to enable our Redis server to run in an isolated environment. The command below will download the Redis container and get it running:
docker run -d --name redis -p 6379:6379 redis
To ensure your Docker container is up and running. Use the command below, it will display all running containers:
docker ps
Let’s get into our Redis docker container shell.
docker exec -t redis sh
Run the Redis CLI
redis-cli
You will see the Redis prompt on your terminal or cmd:
127.0.0.1:6379>
If you have the Redis prompt that means you are good but if you don’t please go through the instructions again.
Local Set Up
If you don’t want to use docker, use this Redis link to install it on your local machine. Once you have the Redis server installed on your local machine. Open your terminal or CMD and run this command:
$ redis-cli
You should have the Redis prompt like the one below:
127.0.0.1:6379>Laravel Setup
As I mentioned earlier, you must have installed PHP and composer on your machine before you can create your Laravel project. You can use this Laravel link to read up on Laravel and its requirements for installation.
Open your command line (i.e your terminal, cmd, etc), and use the command below to create a Laravel project.
composer create-project laravel/laravel redis-with-laravel
My project name is redis-with-laravel , you can name yours whatever you want.
If your project is created successfully then you should have the message below on your command line (CLI)
We are implementing some Redis commands. On this application, we will perform the CRUD functionality. CD (change directory) into your project directory:
cd redis-with-laravel
Open your project on your test editor. Start your project with this command.
php artisan serve
Go to your browser and run the url:
http://localhost:8000
If you see the Laravel home page. Bravo! You are halfway through.
Redis Client
We are installing the Redis client for PHP. In this tutorial, we are using the Predis client. You can check it out here.
Open your terminal and ensure you are in the root folder of your project:
# sample file-path
/v/w/h/redis-with-laravel>
Use composer to install the client on your project:
composer require predis/predis
After installing the Redis Client, open your .env file and update your Redis environment variable.
If you are using Redis Server on your local machine then update your Redis environment variables with these lines:
REDIS_HOST=127.0.0.1
REDIS_PASSWORD=null
REDIS_PORT=6379
For Redis Cloud – go to your Redis cloud account, and click on your database name, it will lead to a page that contains your database credentials. Copy your public endpoint.
When copying your endpoint stop right before the colon.
Scroll down to Security and copy your database password.
Your port number is the digit after the colon on your endpoint. The last variable on the .env file is to tell our application to use the Predis client:
REDIS_HOST=redis-14457.c256.us-east-1-2.ec2.cloud.redislabs.com
REDIS_PASSWORD=j**2**N99V**o**a**9Zc**3**X9**Q**4
REDIS_PORT=14457
REDIS_CLIENT=predis
Or you can go to your config/database.php file and change your Redis database connection from phpredis to Predis. By default Laravel uses phpredis client.
'redis' => [
'client' => env('REDIS_CLIENT', 'phpredis'),
...
]
Change to:
'redis' => [
'client' => env('REDIS_CLIENT', 'predis'),
...
]
Stop and restart your application to update your application with the changes on your .env file:
php artisan serve
On your terminal (still on your project root directory) create a controller.
$ php artisan make:controller UrlController
Go to your app/Http/Controllers you will see your UrlController script.
Import Redis facades and create functions that will store the records on the Redis database.
Let’s assume we have lists of URLs we want to store on the database. The SET command enables us to store the record as a key/value on the database.
namespace App\Http\Controllers;
use Illuminate\Http\Request;
use Illuminate\Support\Facades\Redis;
class UrlController extends Controller
{
public function storeUrl()
{
try {
// the first string is the key and the second string url is the value
$res = Redis::set('url:1', 'http://localhost:8000/example.com');
return response()->json([
'status' => 'successful',
'data' => $res
]);
} catch (\Throwable $e) {
return response()->json([
'status' => 'error',
'message' => $e->getMessage(),
]);
}
}
}
Let’s fetch our record using the SET command
namespace App\Http\Controllers;
use Illuminate\Http\Request;
use Illuminate\Support\Facades\Redis;
class UrlController extends Controller
{
public function GetUrl()
{
try {
$res = Redis::get('url:2');
return response()->json([
'status' => 'successful',
'data' => $res
]);
} catch (\Throwable $e) {
return response()->json([
'status' => 'error',
'message' => $e->getMessage(),
]);
}
}
}
We can also fetch multiple records using the MGET command. on the MGET method, we will input multiple keys and it will fetch the records that match the keys.
 public function GetUrls()
    {
        try {
            $res = Redis::mget('url:2', 'url:3', 'url:4');
        return response()->json([
            'status' => 'successful',
            'data' => $res
        ]);
        } catch (\Throwable $e) {
            return response()->json([
                'status' => 'error',
                'message' => $e->getMessage(),
            ]);
        }
    }
We can store a record with an expiration time attached to the key using the SETEX command. This means once the time elapses the key and value is deleted from the database. Time are stored in milliseconds.
public function StorUrlWithTimeout()
{
try {
// key will be deleted after 60 seconds of creating the record
$res = Redis::setex('url:5', 60, 'http://localhost:8000/example.com');
return response()->json([
'status' => 'successful',
'data' => $res
]);
} catch (\Throwable $e) {
return response()->json([
'status' => 'error',
'message' => $e->getMessage(),
]);
}
}
// fetch record
// After 60 seconds of creating the record it will be deleted
public function GetUrlWithTimeout()
{
try {
$res = Redis::get('url:5');
return response()->json([
'status' => 'successful',
'data' => $res
]);
} catch (\Throwable $e) {
return response()->json([
'status' => 'error',
'message' => $e->getMessage(),
]);
}
}
As you observed I used numbers to make my keys unique because when you are creating a record with an already existing key, Redis will overwrite the old record with the new one. You can use some PHP inbuilt methods to generate a unique key to store your records but ensure your keys are stored somewhere you can easily retrieve them. You can store it as a file document.
You can store records with a hash by using the HSET command. Storing records using the hash is another way of creating a unique for your value.
    public function StoreUrlWithHash()
    {
        try {
            $res = Redis::hset('url-hash', 'url:6', 'http://localhost:8000/example.com');
        return response()->json([
            'status' => 'successful',
            'data' => $res
        ]);
        } catch (\Throwable $e) {
            return response()->json([
                'status' => 'error',
                'message' => $e->getMessage(),
            ]);
        }
    }
Let’s fetch the record with its hash:
    public function GetUrlWithHash()
    {
        try {
            $res = Redis::hget('url-hash', 'url:6');
        return response()->json([
            'status' => 'successful',
            'data' => $res
        ]);
        } catch (\Throwable $e) {
            return response()->json([
                'status' => 'error',
                'message' => $e->getMessage(),
            ]);
        }
    }
Go to your routes/web.php file and setup your routes.
use Illuminate\Support\Facades\Route;
use App\Http\Controllers\UrlController;
Route::controller(UrlController::class)->group(function () {
Route::get('/urls/store', 'storeUrl');
Route::get('/urls/create', 'StoreMultipleUrl');
Route::get('/view', 'GetUrl');
Route::get('/urls', 'GetUrls');
Route::get('/urls/timeout/store', 'StorUrlWithTimeout');
Route::get('urls/timeout/fetch', 'GetUrlWithTimeout');
Route::get('/urls/hash', 'StoreUrlWithHash');
Route::get('/urls/hash/fetch', 'GetUrlWithHash');
});
Open your REST client e.g Postman or Insomnia to test the endpoints.
Let’s go ahead and fetch the records
Now you have learned how to use Redis with Laravel. Try hitting other endpoints and you are free to add more functionalities. Below is an overview of the UrlController class.
namespace App\Http\Controllers;
use Illuminate\Http\Request;
use Illuminate\Support\Facades\Redis;
class UrlController extends Controller
{
public function storeUrl()
{
try {
// the first string is the key and the second string url is the value
$res = Redis::set('url:1', 'http://localhost:8000/example.com');
return response()->json([
'status' => 'successful',
'data' => $res
]);
} catch (\Throwable $e) {
return response()->json([
'status' => 'error',
'message' => $e->getMessage(),
]);
}
}
public function GetUrl()
{
try {
$x = Redis::get('url:1');
return response()->json([
'status' => 'successful',
'data' => $x
]);
} catch (\Throwable $e) {
return response()->json([
'status' => 'error',
'message' => $e->getMessage(),
]);
}
}
public function StoreMultipleUrl()
{
try {
$res = Redis::mset(
'url:2', 'http://localhost:8000/example.com',
'url:3', 'http://localhost:8000/example.com',
'url:4', 'http://localhost:8000/example.com'
);
} catch (\Throwable $e) {
return response()->json([
'status' => 'error',
'message' => $e->getMessage(),
]);
}
}
public function GetUrls()
{
try {
$res = Redis::mget('url:2', 'url:3', 'url:4');
return response()->json([
'status' => 'successful',
'data' => $res
]);
} catch (\Throwable $e) {
return response()->json([
'status' => 'error',
'message' => $e->getMessage(),
]);
}
}
public function StorUrlWithTimeout()
{
try {
$res = Redis::setex('url:5', 30, 'http://localhost:8000/example.com');
return response()->json([
'status' => 'successful',
'data' => $res
]);
} catch (\Throwable $e) {
return response()->json([
'status' => 'error',
'message' => $e->getMessage(),
]);
}
}
public function GetUrlWithTimeout()
{
try {
$res = Redis::get('url:5');
return response()->json([
'status' => 'successful',
'data' => $res
]);
} catch (\Throwable $e) {
return response()->json([
'status' => 'error',
'message' => $e->getMessage(),
]);
}
}
public function StoreUrlWithHash()
{
try {
$res = Redis::hset('url-hash', 'url:6', 'http://localhost:8000/example.com');
return response()->json([
'status' => 'successful',
'data' => $res
]);
} catch (\Throwable $e) {
return response()->json([
'status' => 'error',
'message' => $e->getMessage(),
]);
}
}
public function GetUrlWithHash()
{
try {
$res = Redis::hget('url-hash', 'url:6');
return response()->json([
'status' => 'successful',
'data' => $res
]);
} catch (\Throwable $e) {
return response()->json([
'status' => 'error',
'message' => $e->getMessage(),
]);
}
}
}
Learn more about Redis command
This post is in collaboration with Redis
Related
Redis Developer Hub – tools, guides, and tutorials about Redis
Watch this video on the benefits of Redis Cloud over other Redis providers