Welcome to the second part of this tutorial
If you are just joining us I will recommend you check out the first edition: REDIS Cloud Developers’ Experience With TypeScript – Part 1.
In this blog, we are going to learn how to set up a Redis Cloud account but before we do that let’s talk about the benefits of using Redis Enterprise or Redis Enterprise Cloud on our application.
In the previous article, we were storing data on our local storage and I mentioned such a method is only applicable or recommended for personal test development. If you are developing an application that will be used on production then you have to get a bigger memory by purchasing and setting up your own server and ensuring your server is up and running whenever it is needed. We all know that setting up a personal server or servers is tedious and doesn’t come cheap. This is where Cloud Service Providers come to play.
Redis Enterprise
Redis Enterprise is a multi-tenancy Cloud Service Provider that allows you to deploy and self-manage your data by yourself. Instead of spending so much to acquire and set up your own server you can create a free account on the Redis Cloud and deploy your dataset for a far cheaper cost. Some of the benefits of using Redis Enterprise: Cost efficiency, High Availability, Sharding, Security, Support, Automation and Backup. Imagine doing all these on your own or setting up a team to manage it. That will be pretty expensive!
Redis Account Set Up
Use this link to create a free account or you can login into your account if you already have one. For those of us who are new on Redis then follow the instructions to set up your account.
Go to the account page and create an account by filling out the form and clicking on Get Started or sign up with your GitHub or Google Account button.
If you are new to Redis Enterprise or Redis Cloud there is a free $200 coupon you can use.
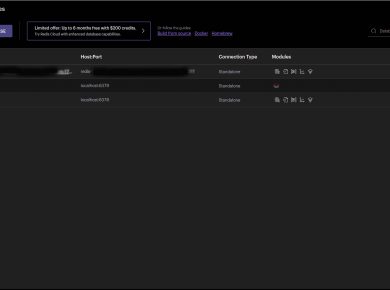
After creating the account you should have an interface similar to the image below.
Click on the New subscription button. it will direct you to the List of Plan page.
Redis has a free plan that comes with 30MB of storage space. I recommend this free plan for test purposes. Go ahead and select your plan. For this tutorial, I am using the free plan. Scroll down to the end of the page, enter a subscription name and click on the Create subscription button.
You can use the Flexible or Annual plan and pay with your free $200 coupon. The code is TIGER200.
The Redis cloud server is up and running.
Let’s create the database that will hold our records. Click on the New database to create a database:
Enter a database name, select the Redis Stack under Type, scroll down and click on the Activate database button on the top-right of the page.
Before we proceed further let me introduce you to Redis Stack.
Redis Stack
Redis Stack is a bundle of Redis modules that are embedded in Redis that enables developers to easily build real-time applications by enabling you to define your data through data modelling. Mind you Redis Stack does not replace Redis Open Source instead is an enhancement to migrate from using Redis just for caching to creating data models and still maintaining performance and reliability. Redis modules are made up of RedisJSON, RediSearch, RedisGraph, RedisTimeSeries and RedisBloom. You can find more details on Redis Stack here.
Now we have a database that is ready to be used.
With our database set-up completed, let’s go to our application and reconfigure the database connection. Adding your remote credentials to your application can be a little bit tricky so I need you to pay attention to these instructions. A sample of how your remote URL should look like:
redis://username:password@public-endpoint
Go to your .env file add a new variable with the sample URL:
REMOTE_REMOTE_URL=redis://username:password@public-endpoint
On your cloud database page scroll down to the Security section under Configuration tab, copy your username and password.
Where you have the username on the local URL replace it with your Redis remote database username and replace the local password with the remote password.
Scroll up to the General section under the same Configuration tab copy the Public end-point value and paste it on your local URL. Your URL on the the .env file should look like this:
# main
REDIS_REMOTE_URL=redis://default:szNKL1W***f94S**ctD5XK**Y4z**o57@redis-17630.***********.cloud.redislabs.com:17630
#sample
REMOTE_REMOTE_URL=redis://username:password@public-endpoint
Go to your src/connection.ts script, replace the process.env.REDIS_URL with process.env.REDIS_REMOTE_URL. Restart your application. Your application should run as if nothing happened.
The next step is to open Postman and hit the create endpoint. This time around your record will be stored on the remote database.
We need to populate our database with more records. Go ahead and add your favourite novels or literature books to your database.
Let’s fetch all the records that we have stored so far on our database. Go to your src/controllers/BookController.ts script and add the following methods to the BookController class:
public static getBooks = async (
req: Request,
res: Response,
next: NextFunction
) => {
try {
const result = await (await BookRepo()).search().return.all()
return res.send({
status: 'success',
data: result
})
} catch (error) {
next(error)
}
}
If you skipped or missed the first part of this tutorial I recommend you use the link at the top of this blog to get yourself updated
Navigate to your routes.ts file and add the following endpoint:
router.get('/books', BookController.getBooks)
Your endpoint should fetch an array of all the books stored in your database. Go to your Postman and hit the endpoint:
Now we have a list of all our records.
Let’s add other functionalities to our application.
Let’s assume we have readers on the platform. We want to know about books that are often read by users on our platform. At this point, we want to make use of some commands from core Redis (i.e. Redis open source). We have to install the Redis client that supports NodeJs which will enable our application to utilise the Redis command. I will be using the node-redis npm package but you are free to check out other clients here. Open your terminal and install the package:
yarn add redis
We have to refactor the Redis connection again. Go to your src/connection.ts script:
import 'dotenv/config'
import { Client } from 'redis-om'
import { createClient } from 'redis'
const url = process.env.REDIS_REMOTE_URL
export async function redisConnection() {
const connection = createClient({ url })
await connection.connect()
return connection
}
export async function redisOmConnection() {
const client = new Client()
const redisConn = await client.use(await redisConnection())
// to check for connection. you can delete it after we have confirmed our connection is successful
const dbCheck = await client.execute(['PING']);
console.log(dbCheck)
return redisConn
}
Go to your src/app.ts and replace the redisClient method with the new one:
import express from 'express';
import { redisOmConnection } from './connection';
import router from './routes';
const app = express()
app.use(express.json());
const PORT = process.env.PORT || 3000
app.use('/api/v1', router);
app.listen(PORT, async () => {
await redisOmConnection();
console.log(`app is running on port ${PORT}`)
})
Restart your application.
We want to know popular books by how often users read the book. Every time a user selects and start reading a book, this endpoint is called. On the src/routes.ts add this endpoint:
router.post('/read/:id', BookController.bookRead)
Add this method to the BookController class src/controllers/BookController.ts:
public static bookRead = async (req: Request, res: Response, next: NextFunction) => {
const key = req.params.id
try {
// check if key exist
const keyExist = await (await redisConnection()).EXISTS(key)
let result;
if (keyExist == 0) {
await (await redisConnection()).SET(key, '0')
result = await (await redisConnection()).INCR(key)
} else {
// returns 'ok' if command was executed successully
result = await (await redisConnection()).INCR(key)
}
return res.send({
status: 'success',
data: result
})
} catch (error) {
next(error)
}
}
Try hitting the endpoint with a different book Id.
Create an endpoint that will return the number of times a book has been read. Add this method to the BookController class:
public static popularBookByReading = async (req: Request, res: Response, next: NextFunction) => {
const keyArr = req.body.keys
console.log(keyArr)
try {
const result = await (await redisConnection()).MGET([keyArr[0], keyArr[1], keyArr[2], keyArr[3]])
return res.send({
status: 'success',
data: result
})
} catch (error) {
next(error)
}
}
In your route file:
router.post('/books/poupular', BookController.popularBookByReading)
On your Postman create an array and paste copies of your book Ids inside the array:
An overview of the scripts in the application.
src/repositories/BookRepo.ts
import { Entity, Schema } from 'redis-om';
import { redisOmConnection } from '../connection'
class Book extends Entity {}
const BookSchema: any = new Schema(Book, {
title: { type: 'string' },
author: { type: 'string' },
pages: { type: 'number' },
publisher: { type: 'string' },
category: { type: 'string' },
publishedDate: { type: 'date' },
},{
dataStructure: 'JSON'
});
const setup = async () => {
const bookRepo = (await redisOmConnection()).fetchRepository(BookSchema)
await bookRepo.createIndex()
return bookRepo;
}
export default setup
src/controllers/BookController.ts
import { Request, Response, NextFunction } from 'express'
import BookRepo from '../repositories/BookRepo'
import { redisConnection } from '../connection'
export default class BookController {
public static createBook = async (req: Request, res: Response, next: NextFunction) => {
try {
const result = await (await BookRepo()).createAndSave(req.body)
return res.send({
status: 'success',
data: result
})
} catch (error) {
next(error)
}
}
public static getBookById = async (req: Request, res: Response, next: NextFunction) => {
try {
const result = await (await BookRepo()).fetch(req.params.id)
return res.send({
status: 'success',
data: result,
})
} catch (error) {
next(error)
}
}
public static getBooks = async (req: Request, res: Response, next: NextFunction) => {
try {
const result = await (await BookRepo()).search().return.all()
return res.send({
status: 'success',
data: result,
})
} catch (error) {
next(error)
}
}
public static bookRead = async (req: Request, res: Response, next: NextFunction) => {
const key = req.params.id
try {
// check if key exist
const keyExist = await (await redisConnection()).EXISTS(key)
let result;
if (keyExist == 0) {
await (await redisConnection()).SET(key, '0')
result = await (await redisConnection()).INCR(key)
} else {
// returns 'ok' if command was executed successully
result = await (await redisConnection()).INCR(key)
}
return res.send({
status: 'success',
data: result
})
} catch (error) {
next(error)
}
}
public static popularBookByReading = async (req: Request, res: Response, next: NextFunction) => {
const keyArr = req.body.keys
console.log(keyArr)
try {
const result = await (await redisConnection()).MGET([keyArr[0], keyArr[1], keyArr[2], keyArr[3]])
return res.send({
status: 'success',
data: result
})
} catch (error) {
next(error)
}
}
}
src/routes.ts
import express, { Router } from 'express';
import BookController from './controllers/BookController';
const router = express.Router();
router.post('/books', BookController.createBook)
router.get('/books/:id', BookController.getBookById)
router.get('/books', BookController.getBooks)
router.post('/read/:id', BookController.bookRead)
router.post('/books/popular', BookController.popularBookByReading)
export default router
Conclusion
We have come to the end of this series.
I hope you learnt a lot from this article. You can go ahead and create more functionalities such as user registration and login.
As usual, I am in the comment section waiting for your feedback.

This post is in collaboration with Redis
Related
Redis Developer Hub – tools, guides, and tutorials about Redis
Watch this video on the benefits of Redis Cloud over other Redis providers